Sunday 15 January 2012

Don't eat that S'more!!! (.....It's a pincushion!)

Whenever I'm sewing and creating things, I'm always reaching for my pincushion, and even though the space that I sew and craft in is really tiny, I am constantly having to move around to find where I last left the pincushion.  I have one right beside my sewing machine, and I also have one on the table with my cutting mat.  The problem arises when I expand to the ironing board, or onto the card table I lay on my bed.  I bring the pincushion from the sewing machine, but then when I go back to sew something, I don't have anywhere for my pins.  So I needed another pin cushion.

I was going to make a pincushion with a wrist strap so I could have it on me all the time while I was sewing, but then the project went in a different direction.  Oh well, I guess I'll just have to make another one :)

I'm not really sure why I chose a s'more.  
Felt/fabric food is actually quite popular I found out throughout my Google searching, and I think it's ADORABLE.  One day when I have kids.... I might need to make them some.
I made a polymer clay s'more a little while ago to try my hand at using the material, and I loved how it turned out. (pictured below)


Not to mention, graham crackers+chocolate+marshmallows= mmmmmm (If you were looking for something you could actually eat, check out my previous post: Chocolate Covered Marshmallows).

Another reason is that looking at this s'more reminds me of camp fires in the summer:)

Best of all, this s'more has zero calories ;)

So here it is: 
How I made my s'more pincushion!


Here are the pieces.  I cut four 4.5" squares in tan, two 3.5" squares in brown, two circles (I traced the top of a spice jar and added another half inch around) and a 2.5" x approx 7.5" white fabric (in this picture the white fabric is 9", but I ended up cutting off some).

Sew it together, but leave a space to flip it right side out.

I like to clip the corners before I turn it right side out so that there is less bulk.

The graham crackers and chocolate flipped right sides out.  Now time to stuff them!

The cracker on the left is done!  I cut one edge of each cracker with pinking shears to make it look like the cracker was split in to two pieces.

Graham crackers + chocolate + marshmallow

Close up of the finished crackers.

Close up of the finished chocolate.

Close up of the finished marshmallow.

= S'MORE (sewn all together!)

Good enough to eat........

.......mmmmm.......
........or store your pins :)
I love how it turned out!!  How much fun would a larger version of this be?  S'more pillows! Anyway, happy crafting.....

Until I write s'more....... (ha ha ha)
~Becca

Saturday 14 January 2012

How To: Safety Pin Bracelet


I'm always looking for inexpensive materials to make jewellery... and this bracelet definitely falls into that category.  It is made out of safety pins, elastic thread and small assorted beads.  I bought my beads at the dollar store:)


Here's a quick 'how to' on how I made it:

Beads, elastic thread and safety pins.  That's all you need :)
Beads on!
Close it up.  Instant bead!  (If you are worried about the safety pin coming open... you could add a little glue.  I didn't, and I haven't had any of the safety pins open).
String the safety pins on to two pieces of elastic thread.  I put a small bead between each of the closed  ends so that the smaller end would be more spaced out.  Make sure all of your beads are facing out.  Tie it up and try it on :)

That's all!  A very quick and simple bracelet to make from inexpensive materials, and it's so pretty too!  There are so many different combinations and colours you could try.  I like the look of the silver for these colours, but I think that a bracelet with purple beads might look really nice on gold coloured safety pins :)


Happy beading!
~Becca

Friday 13 January 2012

Working out is more fun with a new gym/yoga bag!

I like going to the gym already, but having a pretty bag to take your stuff in, makes it even more fun (I swear!)  I found this pattern quite awhile ago, and have been wanting to make it ever since!  This would make a great gift for someone who loves yoga (time to start thinking of home made Christmas gifts already!!.....I know..... it's early.... I'm sorry:) ! ) 
My new yoga/gym bag!
Last year (as one of my first sewing projects) I made a yoga bag.  I got the pattern from Amy Butler's website. (http://www.amybutlerdesign.com/products/free_patterns.php)  This pattern is the 'Nigella Yoga Bag'. 

I was making a cosmetics bag for someone last Christmas and had bought this really neat striped material.  At the time, the fabric store had buy 1 metre get two free, so of course I had to get 3 metres.  That is A LOT of fabric, because it is drapery fabric which comes on those really long bolts.  Needless to say, I had a lot left over after that tiny cosmetics bag, and I still have tons left after making the yoga bag.   The yoga bag I made last year is just to hold a yoga mat (with pockets, to hold things like a cell phone or keys.  I really like it, but I have been wanting something a bit bigger, that was long enough to hold my mat, but also maybe a water bottle, shoes and my wallet.

Yoga bag! (I LOVE this fabric)
I found the pattern at sew4home.com.  THIS SITE IS AWESOME!! (http://sew4home.com/tips-resources/interviews-inspiration/678-s4h-fave-11-yoga-mat-tote).  I love the fabric I chose, and it came from the drapery section again.  The fabric store had the same deal this time for buy 1 get 2 free, but I refrained myself.... because I seriously don't need 3 more metres of a drapery fabric right now.  I bought half a metre, which was almost perfect, but since each piece was 33in, I needed to add some other fabric to the ends (the cream coloured fabric).  I actually like the other fabric on the ends.  I think it makes the bag look more interesting.  The lining fabric is a bed sheet that I am using for another sewing project, I just had some left over. The handles are 1.5" webbing.  I covered a button in the same fabric as the ends of the bag.  
Main fabric pieces
Lining fabric, handles and button loop fabric 
Handles sewn on!
This is right before I flip it right side out.  This is always such an exciting part.  It's like the moment right before you unfold a home made paper snowflake :)     (I got to use my new pinking shears to cut the edge!)

Ta da!

It holds a lot too!! 
Ready to hit the gym!  The finished size of this is approx 26.5" long x 10" high.  (The picture makes it look REALLY big, but it's a perfect size)


Happy crafting!
~Becca

Tuesday 10 January 2012

Dress Form surgery!

Awhile ago I found a video on Youtube that explained how to make your own dress form!  Cool, right?  That’s what I thought.  So I bought a ton of duct tape and Steven helped me wrap myself in it.  (Yes, I spent an afternoon being wrapped in duct tape, so that I could make my own clothes).
The real dress forms you can buy are often really pricey, so even though it would be nice to have a real one, one day, this duct tape body form does a really good job, and it’s exactly my size!  (Well, now after the surgery I performed on it, it isJ)
When I finished making this body form a few months ago I realized, much to my dismay that the waist, hips and bust of the form were several inches larger than my actual body size, and because I had spent so much time on it, I didn’t want to try and fix it.
Here she is.... before the surgery!
Then today, (maybe because I spent the weekend watching Grey’s Anatomy DVD’s) I realized that the fix wouldn’t actually be as hard as I thought.  I just needed to perform a little plastic surgery on it, and maybe a little liposuction.  The problem was that I had stuffed the form WAY too full with paper, and since it was taped around my body it was  automatically a bit larger to begin with, not to mention, while I was being wrapped I was taking super deep breaths so that that the tape wouldn’t be too tight on me (which made it a bit looser I’m sure). 
The simple surgery involved cutting off the base, taking out some stuffing, and cutting out a strip up the back of the form, and re-taping it back together.  I measured as I did it this time, and was very careful not to over stuff.  If the body form is a little smaller than your body, that’s better because you can pad the outside if need be.  Mine is almost exactly my body size now (maybe slightly smaller).
This is before I cut off the bottom, but I remade the bottom the same in the end.  I cut out the shape onto thin sheets of corkboard, cut out a circle for the wooden pole, and then taped/hotglued it to the bottom.


I cut the bottom off.....
Taking out the stuffing.......

A look inside....

I cut a strip out of the back, and taped it back together.

After surgery... and just my size!  Can you tell from all the left over paper, how much I overstuffed?  Don't make the same mistake as me, and measure as you make it :)


The new body form wearing a dress I made a while ago!  Fits perfectly. This is a dress I made out of a very large, floor length skirt from the thrift store, and an old pattern I got from another thrift store for 25 cents!  The zipper and boning for this dress came from another thrift store find that I was using for material. 

There are MANY different youtube videos that you can find just by typing in "Duct Tape Body Form".  I watched many different ones, and then changed a few things to make it just the way I wanted.  A couple of the things I did differently were that I made really short arms.  A lot of the body form tutorials on Youtube show much longer arms, but I was trying to make mine look as much like a real body form as possible.  This is also the reason I chose to use tan coloured duct tape, as opposed to the silver on the outside.  I used the regular silver coloured duct tape, but then just covered the outside layer in the tan colour.  I used newspaper to stuff mine, but some videos use a spray expanding foam, or material.  I used newspaper because it's light, and I had it on hand.  Also, I wore a garbage bag, and then I cut and taped another plastic bag around my neck, tops of my arms and hips.  The LAST thing you want to do is tape directly to your skin!

Good luck if you try making this!  It's really inexpensive, and easy to make.

Have fun!
~Becca

Monday 9 January 2012

"Wooden" you love a new necklace?

After making the wrist warmers, I got to thinking about some of the other crafts I've made that have also cost me next to nothing!  I have made several different necklaces that are unique and fun to wear, but were so inexpensive to make!  Unfortunatley I made the necklaces before I started a blog, so I don't have any pictures of how I made them, but I can tell you what I made them out of, and hopefully inspire you to make some of your own.

You don't need to spend a lot of money to make some neat jewellry.

I always like to look for beads and pendants in the strangest (and inexpensive) of places.  Not only does it cost you less money to wear these necklaces, some of them make quite a statement,and no one else in the room is ever wearing the same one.


Who would know that I got these beads at a thrift store for less than a dollar?!  That's right, these beads weren't always in the form of a necklace.  They used to be pot holders!  So I cut them apart and restrung them as a necklace.  I have so many beads left over for other craftsJ 

How about this necklace?  I made this one by covering the wooden pot holder beads with fabric.  The bigger beads are the plastic inside lids of spice jars (the part with the holes that prevents too much spice from coming out).  I covered them in fabric too.  I bought the spice jars to hold some of my beads, and couldn't part with the plastic inside part, knowing one day I would use them for something.

This is one of the least expensive of all!  It's made of paper.  Some of the beads are made from newspaper, some are made from magazines and some are made from scrapbook paper.  I coated the beads in Mod Podge.

Of course, you could always just use a ton of different buttons to make a quick necklace!  I chose to use multicoloured buttons, but there are so many different colour combinations you could do.  Or you could mix buttons and beads for an entirely new look.

This one is made of old tshirts!  Tshirts are wonderful to use for crafts because they don't need to be hemmed, because they don't fray.

For this necklace, I used magnets that I bought from the dollar store!!  I glued four of them together and then glued a chain from an old necklace around it so that it would be a pendant.  The two polkadot beads are covered buttons.  The polkadot fabric came from an old skirt from the thrift store, and the black beads and clasp for this necklace came from a necklace I bought at the thrift store to deconstruct.


I hope that this has given you some ideas to create new things from old things, and that you are excited to think outside of the box when it comes to crafting.

If you like reading my blog, don't forget to follow me:)

Stay inspired,
~Becca 

Sunday 8 January 2012

Something to wear on those warm winter days....

   How cute are a pair of wrist warmers for those days when its not quite cold, and not quite warm?!  The greatest part about these is that you don't even need to know the first thing about knitting, because they are made from old wool sweaters! It's time to search deep into the back of your closet for those wool sweaters that maybe aren't in the best condition anymore, and revamp them into something totally neat!  

I've been wanting to use wool sweaters for crafting for awhile now, and I finally did!  I always had thought that shrinking wool sweaters, and using the material was called 'felting', but after looking around the internet, I realized that true felting is when you start with unspun wool/fleece.  What I did for this project is called 'fulling'. 

I went to the thrift store and bought 100% wool sweaters, took them home and did exactly what you're NOT supposed to do with wool.  I washed them in warm water and dryed them in the dryer, resulting in a tightly knit, shrunken sweater perfect for me to cut to my hearts content!  (Don't worry if it doesn't shrink too much.... since many wool sweaters end up at thrift stores because they have already been shrunk!).

I cut about 9.5 inches off the sleeves to start with, and I cut out the seam.


I then squared up the sides.  The aprox. size of mine are 8"x 9.5" at this point.


I marked where I wanted my thumb to come through. (I marked it with pins).


I pinned (with the right sides together) all along the side.  Notice how on the left one you can see the two yellow pins I used to mark where my thumb would go (and where not to stitch!)


Sew the seam (but not where the thumb is to go!).  I used a sewing machine... but these could be easily hand sewn too:)

I sewed the seam, above the thumb on an angle so it would be tighter than the bottom.  Then I cut off any excess fabric to remove bulk.  Then flip it right side out!

I ended up cutting off a little more from the bottom.  Then I used the ribbed collar from a regular tshirt to make a cuff around the bottom.  That way the bottom won't stretch too much.  My total finished length is 8 3/4"


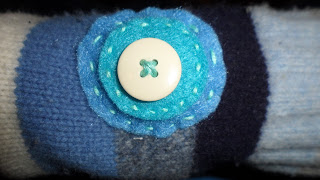
I embellished mine with felt, embroidery thread, and buttons (I love to use buttons!!)
 I didn't do anything with the raw edge around the thumbs because Im not really worried it will fray to much, but I could have stitched it so there was no raw edge.


Think about all of the possibilities of embellishment with these!  Anything would go... lace, rickrack, beads... the possibilities are endless.

Keep crafting,
~Becca