Tuesday 29 May 2012

A Purse :)

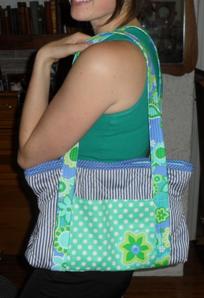
Here's a quick little post to update on some of the craft sale projects I have been working on.  I am currently spending most of my crafting time on quilted bags.  They are very much similar to the one that I made for myself (you can see a picture of it in my earlier blog post here).

I love how this striped one turned out!  It is slightly larger than the one that I have, and I didn't use grommets.  The handles go all the way down the front and the back of the bag.

I also used fusible webbing for the first time to applique the flower to the front.  Fusible webbing is just about the coolest thing ever... and the simplest too!  You just iron it on, and then the fabric won't fray.  I added a cute little stitch around my flower by hand.  I just want to applique on everything now :)

This bag has a magnetic clasp (which gave me a HUGE headache when I initially installed them wrong by forgetting to put the backing on.)  The result was ripped fabric and the clasp looked HORRIBLE.  Once I figured out what was wrong though, it was a quick fix and now it looks great.


Here's a close up of the flower with button and stitching detail.

The interior has two pockets divided in half (so it actually has four pockets), and the front has a pocket too!


I think this bag would look great for the beach!  It's the perfect size for toting around your wallet, keys, sunscreen and even a book.  But it's also purse like enough, to look cuter than just a giant beach tote if you want to go out for dinner later:)

I'll be busy sewing more of these!  I have several in the works, ready to be quilted.  These ones should go a little faster now that I've smoothed out all of the glitches!

Happy sewing :)
~Becca

Saturday 26 May 2012

Reusable Coffee Sleeves

Hello my name is Rebecca and I'm a coffee-aholic............

but I hate hate hate when I buy a coffee from Tim Hortons and I burn my hands all the way out to my car.  I try to bring my travel mug with me most times, but sometimes I don't have it with me, and I feel bad asking for it to be double cupped....... that's when a coffee sleeve comes in handy!

So I just finished making a dozen reusable coffee sleeves for the craft sale! SEW exciting :)

I love how they all turned out!  I made the pattern for them by simply tracing around a cardboard coffee sleeve and then added seam allowances.  The centre is felt so that it won't be hot on your hands when you use them :)

The picture below is of my ceramic travel mug, but they fit on regular coffee cups too.  The button with the elastic cord button loop allows the sleeve to slightly expand to fit tightly on the mug.


Anyway, that's all for now!

Happy crafting,
~Becca

Wednesday 23 May 2012

Upcoming craft sale!!

I'm part of a craft sale in June.

I'm also super nervous and have pretty much been up to my neck in fabric and thread since I said I would join the sale.

I am also SUPER excited!  A craft sale!  Someone actually might buy something that I made!  Whoa :)

The greatest thing so far about creating for this craft sale has been that I am able to make as many things as I want, but that they won't take up room (because hopefully someone will buy them).

It really is getting to the point where I should sell some things anyway, because although I adore making bags and pincushions....... I really can only use so many.

So here are a couple of pictures of some of the things that I have been busily crafting!

Pincushions yummy looking enough to eat!

Mason jar pincushions! (Buttons not included ;)   )

An assortment of clutches (great for makeup bags!)

Here's a close up.  I love the yoyos with buttons :)

MORE pincushions :)
The sale is for 4 weekends in June, and I am sharing the table with a couple of other people.  I'll keep you updated on the progress of more of my selling pieces in the near future.  I have until the 9th to be ready.


SEW SEW SEW


Happy crafting!

~Becca 

Monday 21 May 2012

Tuxedo Apron

No, your eyes are not deceiving you.... this is actually another blog post.

In the same month.

This doubles the number of blog posts from April.  I'm going to try really hard to keep posting more often.

This is going to be a quick little post about a craft that I made last week for my mom.  

At her work they were having a volunteer appreciation dinner/dance, and the dress code was formal, but since my mom is the event coordinator, she was going to be in and out of the kitchen all night preparing/serving food for 200 people.  I don't know how she does it.......but she somehow remains calm, and the food is always great.  (If it was me... I would be freaking out!).


Needless to say, she really couldn't wear a ball gown in the kitchen so she came to me with a black apron and a picture from the internet of a tuxedo apron.

Mine turned out pretty much like the one from the picture, but at a fraction of the cost since I just used scraps of fabric from other projects.

She looked wonderful in her apron and to complete the look she had on a funky feathered top hat fascinator!

Happy crafting :)
~Becca

Sunday 20 May 2012

Finished on a Friday! : Rag Quilt!

I did it!  I forced myself to finish a project that was not done!    Like I was saying in my last post about the lady that makes herself finish already started projects on a Friday.  This is officially my first "Finish up Friday" project!  (Next time I need to post on the Friday... or least on the Saturday.)

Once I was done the project I may have started on other new projects, but that's besides the point because I actually finished something!

It's a rag quilt, and as I said in my earlier blog post, I started it over a year ago.

I went with my sister-in-law and her mom (who is an excellent quilter!) to this local quilting store to buy all the material that I needed.  When the two of us started looking for material to make our rag quilts we both had the same idea........ go for the fun material!  The owner of the store and my sister-in-law's mom thought it was quite funny to watch a 24 and 25 year old getting so excited over kid's material :)

That is why my rag quilt has a mixture of weiner dogs, flowers, spirals and dots! So much fun :)

This is a great way to ease yourself into quilting!

Each square is 10"x10".  The batting in the middle is 8.5"x8.5".

If you choose 6 different colours of fabric and cut 16 squares of each, it will end up like mine.

You layer a piece of flannel, a piece of batting and then another piece of flannel together.  Pin to hold and then sew an 'X' shape from corner to corner on each of the 'quilt sandwiches'.  With a decorative stitch (I used a zigzag stitch--- that's as fancy as Sewphie got) sew a 6"x6" square around the centre.

A neat idea from  sister-in-law's mom is to cut out a piece of plastic and draw an 'x' in the centre.  That way, you can line up the stitching with the drawn on 'x' and trace around the plastic square with chalk!  Neat!

Once you have 48 sandwiches, you are ready to sew them all together.  One side of the quilt should be nice and neat and the other side should have all of the edges showing.  I used a 3/4in seam.  Sew around the whole edge of the blanket when all pieces are sewn together with a 3/4 allowance.
pre-washing/drying


CAREFULLY clip all edges.  Wash and dry.  It will fray up nicely!
Close up after it has been washed and dried
All done! Only took me well over a year....

Then it is time to test out your blanket of course.

I wonder what I'll finish up next Friday :)


Happy sewing:)

~Becca