Tuesday, 28 February 2012

Teapot Cosy

It was my mom's birthday yesterday.  I love birthdays because they are just another reason to craft things for the people you love.  I've been dying to make a teapot cosy that I found a pattern for in a book I took out from the library sometime ago (Quilting in No Time, by Emma Hardy), and since my mom drinks tea, I figured it was the perfect gift.  I love how it turned out!

Even before I drank tea I have always had a thing for teapot cosies.    My mom had a pink and white striped knitted teapot cosy with a pompom on top when I was little.  I wore that as a hat ALL the time as a child (that and a squash ball with a slit cut in it, for a nose.... but that's a different story).

I was very excited about this project because I can say I actually have a fabric stash (which in my opinion is something to be proud of because it means I've sewn a lot of projects).  Except for a couple of the fabrics in the patchwork, all of the fabric I used, I had already had from other projects that I have finished.  I also added rick rack to mine because I just LOVE rick rack.

I'm sure the tea will be very cosy because I have a lot of padding inside!  I used quilting batting and fleece.  The  pattern didn't call for interfacing, but I used it because I didn't think it was very sturdy without it.

Oh and of course I had to try it on my head, because that's what they are made for, apart from keeping tea hot.  For the record, it fit perfectly :)


 How to make it! (I changed several things from the book)

The the cosy pattern you make you will cut: (see diagrams for my my measurements)
-1 from the patch work
-1 from the back fabric
-2 from the lining fabric
-2 from interfacing (optional)
-2-4 from fleece (depending on how much padding you want)
-2-4 from quilt batting (depending on how much padding you want)

*you may not want interfacing if your material is heavier weight, and you may want to omit either the fleece or the batting.  It's up to you!

Once all of the pieces are cut out:
Iron interfacing onto the wrong side of the back piece and the patchwork piece.

Layer (starting from the bottom):
-batting
-fleece
-backing (right side up)
-patchwork (right side down)
-fleece
-batting

Pin it all together and sew around the curve!

Pin the two lining pieces (right sides) together and start sewing from one side stopping, and sewing to the other side.  LEAVE AN OPENING AT THE TOP OF THE CURVE BIG ENOUGH TO PULL THE COSY THROUGH!

Now flip the tea cosy with the patchwork showing.  Place the lining over the cosy, so the right sides are facing.  Sew around the bottom!

Push the cosy through the hole you left in the lining, and sew up the hole.  Now push the lining into the cosy!

Ta da :)


Keep cozy,
~Becca

Wednesday, 15 February 2012

Men's Shirt to Cute Skirt!

I was at a thrift store near my house the other day, and in my searchings I found three men's dress shirts that I wanted to cut up and redesign.

Here is the first shirt that I decided to cut up!  Just a plain ol' boring, large light blue dress shirt.

If you've watched Glee, then you know that Rachel Berry is always wearing these super cute button front skirts.  I love the look!  That's where the inspiration came from.

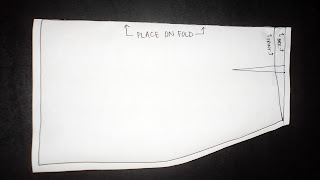
In one of my Youtube crafting tutorial searches I came across this great tutorial to draft your own skirt pattern. The best part of all, is that I just so happen to be the exact same size that she made her skirt, so it was pretty easy since I didn't have to do any calculations.

Here it is!  If you follow the directions exactly in the video you shouldn't have a problem!

I cut off the arms, and then cut off the sides so I would have a separate front piece and a separate back piece

My handy dandy pattern holder---- a rock!

I left the pieces longer than the pattern because I wasn't sure how long I wanted it until I tried it on.

Now for the front.  I laid this out with the fabric open because of the buttons.  I wanted to make sure it was centred.


I transferred the dart markings and then realized the pocket was in the way, so I had to adjust the front darts to closer to the centre line.

The darts.... and then I did exactly the same on the back piece.

Zig zag stitch to attach the elastic waistband

I cut the top of the skirt with pinking shears so the edge wouldn't fray.

I attached a snap at the top on the elastic waist band.
Here's a close up!

I love how it turned out!  I ended up cutting off quite a bit of the length once I tried it on after I had sewn it together.  For the hem I just folded the edge under a 1/4inch and then another 1/4inch.  I used a zigzag stitch with turquoise thread, just for some fun!

In the video it shows that you would be inserting a zipper.  If this were the case you would have to cut the back piece not on the fold but in two separate pieces.  Since I have buttons at the front, I didn't need a zipper.  By not putting the zipper in the back it will have slightly altered the size, making it a little looser (but barely).

It was very neat to draw my own pattern!  Now that I have the basic skirt pattern I can alter it to make all kinds of skirts, as well as dresses!

Happy Sewing!
~Becca

Tuesday, 14 February 2012

Wrap Bracelet

I know that my last post was about a bracelet that I made, so bear with me on this post because it's another bracelet.  Don't worry though, it's completely different.

I have been seeing all kinds of different wrap bracelets and I just LOVE how they look!  There are many great tutorials to watch and read on how to actually construct the bracelet.  You are basically weaving beads between some kind of cord or lace.

First I cut two long pieces of cord and then I folded them both in half.  I made a knot  at the end so that I had a loop (big enough for the button I chose).  I then attached it to the clipboard so that it was separated (two strands on one side and two on the other).

Then using embroidery thread, I wove the beads between the cord.  Just like in this video from makebraceletsblog.com.
Beads from the dollar store and braiding cord (I bought mine at Walmart)


I chose a wooden button to go along with the beads I used

I LOVE how it turned out.  I made mine so that it would wrap around my wrist twice, but you could try making it shorter so it only goes around once, or you could make it really long so it goes around 3 times.

I'm quite excited to try out some more of these.  I'll have to post them on Pinterest when I do!

And now for a corny joke.....

That's a WRAP,
~Becca :)

Wednesday, 8 February 2012

Zipper Bracelet

Anyone else addicted to Pinterest???  I certainly am!  I was inspired to make this bracelet from a tutorial I found on Pinterest.

I made a few with tshirts like in the tutorial, but I wanted to try something a little bit different.  So I searched through some of my crafting boxes for inspiration.... and I came up with the idea to use zippers instead!  I'm am always buying giant bags of multicoloured zippers at a thrift store near my house.  I think I paid something like a dollar for 25 of them!

Anyway, here's a quick overview of how I did it.  Here is a link to the tutorial so you know how to do the 5 strand braid.  I was going to photograph it while I was doing it myself, but why reinvent the wheel, when this tutorial explains it all!


here are my zippers!

I separated them and then cut of the ends of each

safety pin it together

braid it! (I then added some faux leather lace to mine)

embellish it! I used an old earring.... I cut off the parts I didn't want


sew it in
glue on a snap!   (this glue is SUPER sticky!)


I reinforced this with thread once the glue dried (not pictured here)

ta da!

view with the bling :)
Cool right?

I might be slightly addicted to the 5 strand braid..... headbands, bracelets, necklaces.... the possibilities keep going!

Now I'm left with 5 little zipper pulls.  Of course I didn't toss them out!  I'll just need to find some way to use them :)

Keep on crafting!
~Becca

P.S..... If you like reading my blog.... follow me :) .... or follow me on Pinterest

Saturday, 4 February 2012

Lace Dress

It's been rather warm this week and feeling somewhat like spring, which got me thinking about the material that I had bought awhile ago to make a dress.  I saw a dress in H&M last year that was made of lace, and I loved how it looked.  Now that my dress is made, I think I might need to wear it with some tights, because I don't think I can wait 'til the warm weather!

I started out with a basic dress pattern to make this dress.  I used burda young pattern #7390, and went with view A.  I did some adjusting to the pattern though because I didn't want it to be quite so wide at the bottom.  I've been looking for a basic dress pattern for a while, and when I saw this (and it was on sale for 50% off!) I decided to pick it up.  The great thing about having this pattern now is that I can adjust it to make all kinds of different dresses and tank tops.

The tan coloured tissue paper is the original pattern.  The white paper is the new pattern I made.  All I did was slightly take in the sides.  I did this to both the front pattern piece and the back pattern piece.  Pictured here is the front pattern piece.
I used a cream jersey knit material for the lining and a cream lace material over top.  There were many different "fashion" lace options at the fabric store (specifically for clothing), but I thought they were all really ugly, so I went to the curtain section, and bought my lace there.   So yes...... when I wear this dress..... I probably match somebody's curtains :)

This is quite a loose fitting dress.  I wanted it to be loose so I could belt it in different ways.  I also cut a strip of the jersey material so I could use it as a belt that blends in and just changes the shape of the dress.
I have belted it high on my waist here with the strip of material.
I have belted it across my hips here for more of a drop-waist look.
Of course it also looks really cute with other belts too!
Here is a close up so you can see more of the lace detail.  (Sorry about my shadow!)

I hope you're inspired to make an article of clothing:)

A dress like this would be a great place to start because it is so simple (only two pattern pieces!), you get a quick result, and since it is a looser style, there is much more wiggle room when getting the garment to fit just right!

Oh!  I almost forgot to mention..... this is the first piece of clothing my body form has worn since her surgery, and it fit her (and me!) perfectly.

Happy sewing!
~Becca

Thursday, 2 February 2012

T-shirt Necklace/Scarf

Hello again!  I have been quite busy with work lately, and haven't been crafting as much as I was several weeks ago, but I couldn't hold off any longer, I needed to cut some material!!  I grabbed an XL tee that I bought a while ago and cut cut cut!!  (There's something so relaxing about cutting material!)

Anyway, the awesome part about tshirts is that they don't fray like some other materials, and when you cut a strip and pull it, it curls up quite nicely.

So here is my tshirt necklace/scarf:

wear it short.......

....or wear it long!


I made it a little more interesting with a denim rose I made a while ago.  I have been wanting to use that rose forever, but couldn't find a use for it, so until now it was just pinned up on my cork board waiting to find a home.  It is attached permanently to the scarf, as I pinned and glued it in place!

Think of all the fun colours you could do as well, and all of the interesting things you could add too it.  My mind is racing with all of the possibilities!  I might just have to make another one soon:)

Happy crafting!

~Becca