Monday, 8 April 2013

At last.... a post!

This post has been sitting in the "draft" section of my blog for quite some time.  I have been spending most of my crafting time on wedding related things.... and especially on sewing my wedding dress, (which is working out! YAY)

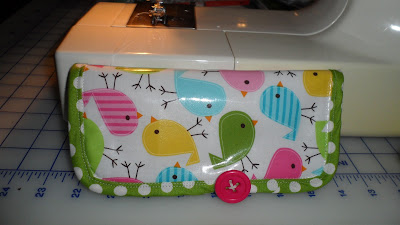
Anyway, awhile ago, I decided to make myself a new wallet!  I'd been wanting to buy one for awhile because the one I was using was falling apart and kind of embarrassing to take out of my purse.  I couldn't find one that I liked A LOT, so I made one instead..... then I had so much fun making the first one... I made a second one because I wanted to try using laminated cotton.

I liked how they both turned out....

Here they are:)


They have buttons for the closure (I'd like to make one with a magnetic snap) and they have 6 card spots (although I fit up to three cards in the pockets).  The pocket has a snap to keep receipts and cards from falling out.

The only feature my wallet is really missing is a coin pocket....

So I designed this wallet.....


This is the third draft, and I think I love it now.  It was for my sister-in-law as a thank-you-for-letting-me-borrow-your-sewing-machine-forever gift after Sewphie died (read about it here).  The photos are also courtesy of her :)

I'm hoping to open up an Etsy account once I'm a married woman, and no longer sewing a wedding dress :)  This wallet will be one of the designs I sell.

I've now been using draft 2 of the wallet and even with it's flaws, I love it!

As for the laminated cotton.... I'll have to give it another try... and do a little research on sewing with it.  It kept getting stuck with my presser foot on my machine.

Happy crafting:)

~Becca


Monday, 14 January 2013

Fuzzy Dinosaur Onesie PJ'S


Okay... so even though I know that the one piece pyjamas are in style right now......

I will NOT admit to  making these for myself....
There will be NO photo proof of me wearing these......
Ever.
BUT if I did happen to make these for myself......

I would have to say that they are THE WARMEST pyjamas ever and that it is like being wrapped in a blanket all the time.  How could they not be super warm and fuzzy, when I made them out of polar fleece!  
I used yellow ribbing fabric for the collar, the ankle cuffs and the sleeve cuffs.


The dinosaurs ALMOST match up 
Want to make your own???......
This is the pattern I used....

Happy sewing!
and stay warm :)
~Becca

Sunday, 13 January 2013

E-Reader Case

I was VERY lucky to have been given a Kobo e-reader for Christmas this year!  At first I wasn't really sure if I would like it, because I really like holding a book... but I have to say that now, after finishing a few books on it..... it is awesome!

Of course, this would inspire me to make a case.

Buy a case from the store and miss a crafting project???? I don't think so!

I'm not 100% in love with how it turned out.... but I like it.  I might make myself a different one, and change a couple of things about it.

But for now.... it will do.

I LOVE the fabric on the outside of the case though.  I found it in the drapery section of the fabric store, and have had it for a while, but I didn't know what to do with it.


I took these pictures before I was done clipping all of the threads! oops :)


Until next time!  Happy Crafting!!

~Becca

Saturday, 12 January 2013

Floral Tank Top

 You know that bin at the back of the fabric store with the sign that says "50% off lowest price"  because they are the remains that aren't quite big enough to cut and sell any more??

That's where the top I made came from!  I saw this pretty floral patterned material and thought it would make a perfectly cute tank top!

So I took a very favourite fitting tank top of mine......
Made a pattern out of it.......

Cut the pattern pieces out on the bias of the fabric (for ease of movement while wearing... because it is not a knit fabric).......

Made bias tape out of the fabric, so it would match perfectly.......

Pinned it on..... and sewed it up!

TA-DA!!!......

 I made this a couple of months ago... but only just wore it for the first time last night..... so now that I have, I thought I would post about it :)

It fits wonderfully..... just like the tank top I made the pattern from!  I will DEFINITELY be making more from this pattern.

Also.... the necklace I wore went perfectly... because it is a leaf, just like on the shirt :)

I found the leaf charm in a collection of charms at Michaels craft store... on the clearance bead section, and just added some chain and a clasp!

Happy sewing!
~Becca


Friday, 11 January 2013

Crafty Christmas

I know it's been a few weeks since Christmas, but I wanted to make a post about all of the crafting/baking I did over the Christmas holidays!!

I've had this blog now for just over a year, and one of the first posts I made was about my "A Completely Crafted Christmas" post.

Well, here is this years version!! I can't claim that this is completely crafted like last years, but there are many things that I did make.

So here they are:

                                          Starting off with my MANY gingerbread cookies!


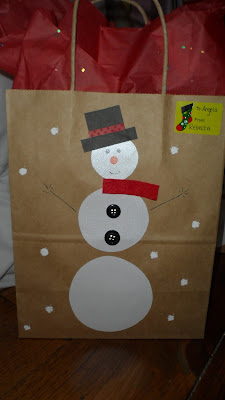
I also made many of the gift bags that I wrapped things in.... this snowman gift bag was one of the designs I did (those are real buttons and felt for the scarf)

This year I attempted making candles for the first time.  They were definitely not as easy as I thought they would be.  Some of the problems I encountered were that the scent was either too strong (on the lavender ones) and not quite strong enough (for the vanilla), as well, once the wax cooled, some of the candles I made had cracked down the center.  Some of them worked fine, but some did not.  I used microwavable soy wax and mason jars (which I covered with fabric for the lids).

I also made several reusable shopping bags!  They are reversible!  I made this pattern from an old bag I had (changed slightly) and have made several of these bags since.... they hold SO much stuff and are so small they can fold and fit in your purse!


 Last year (as you will notice from my post) I made my dad a snuggie.  Well... this year he requested another snuggie (to take to the cottage).  His favourite character is Tow Mater from the movie Cars.... and I just so happened to find some polar fleece with Mater!!!  What luck :)


 To go along with some store bought gifts for my brothers, I made some sugary snacks!  (also... I figured out how to print labels on my computer.... which will definitely come in handy for sending out wedding invitations in the near future)


I made Steven's niece a hooded puppy hooded towel... complete with a tail!  (I just had to test it out....)


I made 4 bags (I know... only three are pictured... forgot to take a picture of the last one).  These were so much fun to make!!!!! Picking out the fabric was so fun, and they hold A LOT of stuff! 


I made Steven a bowtie for Christmas..... however I need to adjust it to make it a bit longer.... so I will have to make another post about that one!

Overall, it was a fun and crafty Christmas.... and already this year is going to be filled with MANY crafting adventures.

I have lots on the go and lots to be done.

Happy Crafting,
~Becca

Saturday, 3 November 2012

My Halloween Crafting

Halloween has come and gone again.

And now onto more exciting things (CHRISTMAS!!!!!!).

I have officially begun listening to Christmas music.

But I thought I would make a post about all of the fun things I made for Halloween:)  Steven and I were Batman and Robin last year and we absolutely loved how those costumes turned out... so we had to think hard about what we were going to be this year.

Conclusion: NERDS.  Not just the people kind, but also the candied kind.  I saw this idea online, so I thought I'd give it a try!

I'm pretty content with how it all turned out.

How I made the boxes:  I drew and painted (with acrylic paint) the front of the Nerd box onto bristol board.  Then I covered it with clear vinyl adhesive book covering (I bought rolls of this stuff at the dollar store!!).  I did the same for the back of the box, although the back of the box isn't painted, it is just drawn on with markers.

To make the boards more stiff, but not so stiff we couldn't move, I used regular cardboard on the top half of the front and back pieces.  I just taped it down.  We were able to sit down (reasonably comfortably) because the bottom half was just the flexible bristol board.


The shoulder straps are packing tape (which I taped on both sides, so it wouldn't stick to our shoulders).  Once the costumes were on we taped the sides with some more packing tape.

That's all!!  I love how they turned out :)

For my mom this year I made her a Minnie Mouse costume (last year I made a poodle skirt, and she went as a girl from the 50's).  I was lucky to find a polka dot dress at the thrift store.  From there I hemmed it, and used the extra fabric to make the bow for her ears.  I sewed on some ruffles and lace to the dress (and on her socks!).  The ears are made from thick adhesive felt glued onto a black hair band.  I added three black lines to a pair of white winter gloves (not shown in the picture).  A black turtle neck, black tights and a pearl necklace topped the look off!
Minnie! 
Since my mom wore her costume to work the day before Halloween for their main event, for the actual day she needed something a bit simpler, as she was playing the piano for a concert.

I made a simple witches had hair band, complete with jeweled spiders (which happened to match my spider web earrings perfectly).

I used felt for the top of the hat (and the brim.... but you can't tell) and black lace under the brim  that came from a dress someone donated to me for crafting! 

Hope everyone had as fun of a Halloween as I did :)

Happy crafting,
~Becca


Tuesday, 9 October 2012

Pumpkin Spiced Lattes and Sugar Cookies:)

Wow.  

It's been a REALLY long time since I have written a blog post.  I would love to say that I will make a better effort to post more.  But I'm not going to say that..... since it might not happen.

However.... just because I have been EXTREMELY lazy about posting, certainly doesn't mean that I have been lazy about crafting!

I have many things on the go at the moment.  One of those things being ..... my WEDDING!! I am engaged and planning to DIY a lot of the stuff.  However I don't want to post certain things on the blog, since a certain groom-to-be might see them ;)

Also... I have already started MANY of my gifts for my 'Completely Crafted Christmas'  but can't post THOSE either.

On a completely different topic, Thanksgiving just passed and I had fun making these SUPER cute sugar cookie  leaves (thanks Pinterest!).
the sugar cookie dough is food colouring dyed

separated

and smushed together

cut out.  this batch made 12 leaves and one pumpkin (the pumpkin was for test-tasting purposes!)

baked!

and decorated with a mixture of green, yellow, orange and red sugar

And I have been addicted lately to pumpkin spiced lattes.

Steven and I went to get a coffee at Starbucks the other day and I thought I would get a pumpkin spice latte (so that I could try to steal their recipe!).  WELL.... it's a good thing I've discovered how to make my own!  A tall pumpkin spice latte cost $3.95!  Yikes!


Here's how I made mine:

I started off by making a pumpkin spice sugar syrup by straining 3/4 cup of water through a fillable tea bag (you can buy these at bulk tea stores) filled with 1 tbsp of pumpkin spice.

By straining the water through the tea bag this avoids having any gritty spices in your drink!

**You might be able to use a coffee filter.  I haven't tried it... but I don't see why this wouldn't work.

Then I dissolved the flavoured water and 3/4 of a cup of white sugar in a pot on the oven.  Once it is dissolved... remove it from the heat.

Now you have pumpkin spice simple syrup!  (This made about a cup of syrup)

pumpkin spice sugar syrup
To make the Latte:

The coffee:  I used a Rainforest Espresso K-cup in the Keurig machine and brewed 4oz.
*you could use any type of espresso-  they even make instant expresso powder.
*I'm sure you could even try REALLY strong brewed coffee

The milk/cream:
I happen to have a milk frother.  I bought on the sale rack of a kitchen store.  DON'T go out and buy one just for this.  You could just whisk the heated milk!

I put 3/4 cup of milk and 1/4 cup of 5% cream in the frother and heated it for about 2 min in the microwave and then frothed it.
heated milk and cream ready to be frothed

The syrup:
I added 2-3 tbsp of the sugar syrup to the coffee.

I poured the milk into the coffee and stirred and then added whipped cream (a must!) and sprinkled a little more pumpkin spice on top.
mmmmm..... whipped cream

I think it tastes delicious!! You will have to play around with amounts of sugar and the types of coffee.  But here is a starting point!  Definitely worth trying to make your own.  Your piggy bank will thank you :)

Enjoy!

~Becca

Sunday, 29 July 2012

Polka dots and bows

I bought this really cute fabric not that long ago that I have been wanting to make into a dress.  I fell in love with the polka dots and the bows.  It's so cute!

I made this dress by making my own pattern.  I traced an existing dress that I had in my closet that I liked the shape of.

(Although I used the same pattern pieces for lining and main fabrics, I made the sheer fabric about 3 inches longer so that it would be slightly longer than the lining.)

Since this has an elastic waistband I thought it would be perfect for this material because it doesn't have much stretch (and the lining has even less).  This style was a little easier to work with because I didn't need to make it an exact fit.

The dress I traced didn't have a lining because the material wasn't sheer.  I added a lining to mine because it was.

I did things a little different than would normally be done, but I liked how simple it made to finish the arm holes and neckline.

I cut out the two lining pieces and the two main pieces.

Next, I hemmed the lining.

I then placed the lining piece (right side up) and the lining piece (hemmed edge down) and sewed around the whole thing EXCEPT for the bottom.

I turned the pieces right side out.  This created a nice edge with no frays.

I did this for both the front and back pieces.  I then sewed the shoulders together.

I finished the arm wholes and neckline by doing topstitching all the way around.

Then I placed the right sides together, sewed up the sides and hemmed the sheer fabric.

For the elastic waist band I sewed some wide bias tape on the inside of the dress through both layers of fabric and then added the elastic cord through and tied it together.


The best part was.... it worked!!

(I'm always shocked when it does!  It's SO exciting)

I will definitely be using this pattern again.  A very simple dress pattern that could be changed so easily.

I wore it out for dinner the next night with some strappy sandals and a long necklace.


Happy sewing!
~Becca

Don't forget to follow me on Pinterest:)